Developing with Objective Pascal
Part 3: iOS Simulator and Xcode 4
Contents
Introduction
Requirements
Parsing iOS headers
Your first Objective Pascal Cocoa Touch app
Adding UI elements and delegate code
Next steps
Introduction
These notes describe how to get started developing Cocoa Touch applications for
iOS using Pascal. You should already have installed Xcode 4 and reviewed
Part 1 and Part 2.
As with OS X development, iOS development is done in Apple's
Xcode 4:
- You create a new project in Xcode using a custom Pascal template instead of
a built-in Objective C template.
- You compile your Pascal code in Xcode using a Free Pascal compiler, which
provides an "Objective Pascal" dialect for working with Cocoa Touch.
To avoid information overload, this article focuses on creating iOS apps
for the iOS Simulator (included with Xcode). Part 4 turns to the subject
of compiling for an actual iOS ARM device. Note that if you do not have
access to an iOS device, you can skip Part 4 for now and just use the
iOS Simulator for all development.
What is Cocoa Touch?
Cocoa Touch is a group of frameworks included on every iOS device that you use
to create your app's user interface. Key among these frameworks are UIKit,
which is analogous to Cocoa's AppKit, and the familiar Foundation. You can
think of UIKit as an AppKit that has been reorganized, modernized, streamlined
and optimized for touch devices. It consists of many fewer classes than Cocoa,
yet adds a few of its own. For example, where WebView is in the separate WebKit
framework on OS X, on iOS UIWebView is part of the UIKit framework.
A list of UIKit classes is here
and a list of Foundation classes is here.
An overview of other Cocoa Touch frameworks is here
and an overview of iOS is here.
How does Cocoa Touch development differ from Cocoa?
Cocoa Touch resembles Cocoa in many ways and many of the
concepts and techniques that you learn while developing for Cocoa apply to
Cocoa Touch development as well. However, there are a few differences worth noting.
- Different user interface library, as described above.
- With OS X, apps have a main menu and generally start out with either
a main window or a document window (see Parts 1 and 2). These two types of
user interfaces describe the vast majority of OS X apps. But with iOS, there
is no main menu, no precise mouse, only blunt touch, and it initially
targeted a very small screen (320 x 480) where only one view or window could
be displayed at a time. As a result of these differences and the
addition of the iPad (768 x 1024), a number of new user interface
"patterns" emerged. This requires more than just two Xcode templates.
- Two Free Pascal compilers, rather than just one. This article focuses on
using an i386 compiler to build for the iOS Simulator; Part 4 focuses on using an
ARM cross-compiler to build for an actual iOS device. (The iOS Simulator does not
emulate the execution of ARM instructions. Rather, you link i386 code against
equivalent i386 iOS frameworks - hence the reason why two different
compilers are needed.)
- With the compiler that you used in Part 1, you also automatically got the
CocoaAll unit that allowed you to work directly with Cocoa classes. This unit was
created from Cocoa's AppKit, Foundation and CoreData framework header files
(Objective C .h files). With iOS, Apple does not permit any derivative work
based on the Cocoa Touch headers to be distributed, so you will need to create
them yourself, as described below.
Requirements
- Mac with OS X 10.6 Snow Leopard or later (10.7 Lion or later recommended).
- Xcode 4.2 or later (Xcode 4.5 or later recommended).
- Free Pascal compiler version 2.6.2 for i386. If you worked through Part 1
you've already installed this compiler; otherwise, you can download the
installer from here: ftp://freepascal.stack.nl/pub/fpc/dist/2.6.2/i386-macosx/.
- Custom Xcode templates for Objective Pascal. If you don't already
have them, they're available from here.
Unzip and place the Objective Pascal folder below
/Users/yourname/Library/Developer/Xcode/Templates
(you will need to create the Templates folder if it doesn't exist).
- Parsed iOS headers. See the next section.
Parsing iOS headers
The iOS header files (.h) are ready to use if you're developing
with Objective C, but not with Objective Pascal. Even though Objective Pascal
can work with ObjC classes, it needs its own Pascal equivalents to the
ObjC header files. Since Apple does not permit derivatives of the iOS SDK
files to be distributed, you'll need to create these Pascal files yourself.
Fortunately, Ryan Joseph (thealchemistguild.com) and Jonas Maebe (Objective
Pascal's architect) have teamed up and created a parser that can parse the
header files from just about any iOS (or OS X) framework and create these
Pascal files automatically.
The latest version of the parser is available here:
iOS_6_Parsing_Status.html
Follow the parsing instructions, then compile the iPhoneAll unit for the
Simulator.
The iPhoneAll unit is analogous to the CocoaAll unit used in Parts 1 and 2
and provides access to the UIKit, Foundation, QuartzCore and OpenGLES
frameworks. Since the iPhoneAll unit was not installed with the compiler,
the compiler doesn't know where it is, so you'll need to specify the path to
it when you compile an iOS app. And to avoid recompiling iPhoneAll each time you
switch between the Simulator and ARM compilers, you'll probably want to move
the compiled files somewhere else. The template used in the next section
assumes that the compiled iPhoneAll files for the Simulator are in the following
location, although you can place them wherever you want and just edit the path
in the build settings of any project you create with the template:
/Developer/ObjectivePascal/units/i386-iphonesim
Here are the files you need to copy:
iPhoneAll.o
iPhoneAll.ppu
AnonClassDefinitionsUikit.o
AnonClassDefinitionsUikit.ppu
Your first Objective Pascal Cocoa Touch app
Start Xcode and choose File | New | New Project. Under iOS you should see
Objective Pascal (if not, you probably don't have the templates installed
in the correct location). Click Objective Pascal and select the
Window-Based Application template, then click Next and enter the following:
- Product Name - enter Test3 for this example.
- App Delegate Class - this will be the name of your application delegate
class; for this example, enter Test3AppDelegate.
- Device Family - you can choose iPad, iPhone or Universal; for this
example, choose Universal.
Now click Next and navigate to where you want to save the files that will be
created. For example, if you navigate to /Users/yourname/Documents and you
entered Test3 for your project name, Xcode will create a folder named Test3
under Documents. Inside this folder it will create two additional folders,
named Test3 (for your app's files) and Test3.xcodeproj (for its project files).
Several of the files that the template creates are the same as in Part 1,
but there are some differences. For example, to save on vertical space
in the Project navigator with a universal app, the template dispenses with
grouping the Objective C files and the Pascal files together. Instead, files
are grouped by device. Other differences are noted below.
Figure 3-1. A universal app's files.
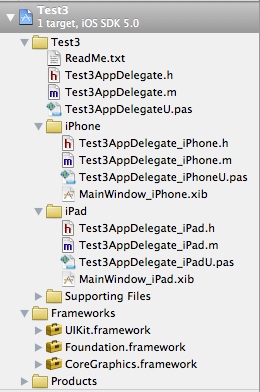
ReadMe.txt - brief getting-started instructions for the new project.
Test3AppDelegate.* files - similar to Part 1.
Test3AppDelegate_iPhone.* files - subclass of Test3AppDelegate for iPhone;
.xib file loaded when run on an iPhone.
Test3AppDelegate_iPad.* files - subclass of Test3AppDelegate for iPad; .xib file
loaded when run on an iPad.
Supporting Files - similar to what's found in Parts 1 and 2; the Pascal
program file is in this group too.
Frameworks - all Cocoa Touch apps use the UIKit and Foundation frameworks;
you can expand these to view the framework header files (.h).
On the target's Summary tab, set the iOS Deployment Target to the earliest
version of iOS you want to support. Once you've done this, go ahead and
compile and run your app in the iOS Simulator (Product | Run), although
the app doesn't really do anything yet.
Adding UI elements and delegate code
Adding UI controls and code to a Cocoa Touch window-based app for the iPhone
or iPad is similar to adding them to the simple Cocoa app described in Part 1,
so we're skipping that exercise and moving right to the universal Cocoa Touch
app. With a universal app, there are two window .xib files. Since an iPad's
screen has over five times the area of an iPhone (or iPod touch) screen, you'll
want to design two different user interfaces, one for the iPad screen and
one for the iPhone screen.
Set up Xcode's panes as described in Part 1, then do this:
- Drag and drop a Round Rect Button control onto MainWindow_iPhone.xib's
window. You can leave the placeholder text on the window or delete it.
- Do the same for MainWindow_iPad.xib.
- By default the buttons do not have a label, so select one of the buttons
that you just added and click the Attributes inspector button at the top
of the Utilities pane and enter something in the Title box (for example,
"Touch Me").
- Do the same for the other button.
- Click the New Referencing Outlet's circle for the MainWindow_iPhone.xib's
button, then drag and drop it to the Test3AppDelegate.h file (just below the
window IBOutlet). Xcode will prompt you for a name - enter "button".
- Now click the New Referencing Outlet's circle for the MainWindow_iPad.xib's
button, but this time just drag and drop it on the delegate yellow cube
in the vertical list and choose "button" when prompted.
- Declare the button in your Pascal delegate class too (Test3AppDelegateU.pas),
just below the window declaration, so it looks like this:
  window : UIWindow;
  button : UIButton;
- Click the Touch Down's circle for the MainWindow_iPhone.xib's button,
the drag and drop it to the Test3AppDelegate.h file (just below the "}").
Xcode will prompt you for a name - enter "buttonTouchDown".
- Now click the Touch Down's circle for the MainWindow_iPad.xib's button,
but this time just drag and drop it on the delegate yellow cube and choose
"buttonTouchDown" when prompted.
- Declare this action's receiving method in your Pascal delegate class too
(Test3AppDelegateU.pas) so it looks like this:
procedure buttonTouchDown(sender:id); message 'buttonTouchDown:';
And add it to the implementation section too, along with a line of code
that sets the button's label:
procedure Test3AppDelegate.buttonTouchDown(sender:id);
begin
  button.setTitle_forState(NSSTR('Touched!'), UIControlStateNormal);
end;
- You also need to release any outlets you add, so insert this line in
the Test3AppDelegate.dealloc method:
button.release;
Now choose Product | Build and build your app. If the build fails, check the
error message and review the steps above. Note what we're doing here: since
both windows have a button that we want to respond to in the same way (by
simply changing the button's label), we only have to do this in the Test3AppDelegate
superclass, not in each subclass. The subclasses (Test3AppDelegate_iPhone and
Test3AppDelegate_iPad) are where you make connections for UI controls that are
specific to the iPhone or iPad.
Once the app builds successfully, run it in the iOS Simulator. Make sure
iPhone Simulator is selected as the Scheme just above the Project navigator.
When the app runs (in a likeness of an iPhone), click the button - its label
should change to "Touched!".
Now select iPad Simulator as the Scheme and run the app again. You should now
see the likeness of an iPad. Again, click the button - its label should also
change.
Next steps
You'll notice that there's also an iOS Device choice in the Scheme list. If
you select this and choose Product | Build, you might get an error message about
a missing provisioning profile. That's for Part 4 - setting up to run on
an actual iOS device.
Copyright 2011 by Phil Hess.
macpgmr (at) fastermac (dot) net
First posted April 24, 2011; last edited Feb. 25, 2013.